Saturday, September 15, 2012

Giveaway!!!


We finally made it to 30 fans on Facebook!  To thank you all, I'll be giving away a set of makeup brushes made by Real Techniques.  The winner of this giveaway will get to choose between a set of foundation brushes or a set of eye shadow brushes.  To enter this giveaway you MUST be a fan on Facebook.  That is the only rule.  The giveaway ends on September 19th and begins tonight at midnight.  I will be using Rafflecopter to insure you guys that this will be 100% fair.  Other than posting the link, I will have no part in the actual selection of a winner.  That will be done for me by Rafflecopter.  To enter, just click below!  


http://www.rafflecopter.com/rafl/share-code/YTEzMjcyMWE3MGY5ODFlODBkYzI0NTg0OTAyOTYzOjA=/
a Rafflecopter giveaway

Sunday, September 9, 2012

Follow me on Facebook!


Be the first to know what's up!  New reviews, tips and giveaways posted to Facebook for fast access!  I'll be giving away some makeup when I reach my magic number of followers.  Want to know what that magic number is?  Find out by following me on Facebook.  I'll announce that soon!


Wednesday, September 5, 2012

3D Lips

You will need the following items to create this look:
  • Opaque lipstick (preferably bright or dark colored)
  • Lip liner (similar color to lipstick)
  • Fluffy eyeshadow brush 
  • Eyeshadow
Saying that creating this look is easy may be understatement!  I can probably sum it all up pretty quickly.

First, use a lip liner to line only the outermost part of your lips.  This will help to prevent feathering.  Feathering is when your lipstick runs out into the small cracks outside of your lips; not attractive.

Fill in the rest of your lips with your favorite opaque lipstick.  Don't use anything sheer or too sparkly.  

Now, this is where the magic happens!  Grab an eyeshadow in a lighter shade than the lipstick you just applied and a small fluffy eyeshadow brush.  Pick up a good amount of eyeshadow on your brush and gently tap the brush to remove the excess shadow that may have otherwise fallen out all over your chin.  DUCK FACE!  That's right, stick your lips out like you're getting ready to kiss someone and swirl the eyeshadow around the inner part of your lips in a circular motion.  Be very careful after applying the eyeshadow not to rub your lips together.  You want the eyeshadow to stand out, not blend in.

Voila!  That's all there is to it!  Told ya it was easy!!!


Tuesday, September 4, 2012

Foundation


There are some people in this world with perfect skin.  No blemishes, even complexion, and a perfectly smooth face.  I, personally, know nothing about this perfect skin I speak of.  I haven't had perfect skin since I was a child!  I do however know how to create the illusion of a smooth and flawless complexion.  As with any project, which is what I consider my face to be when covering up flaws ha ha, you have to start at the base and work your way up.  Have you ever built a house?  Me neither!  But you can't build a house without putting down a foundation, right?  That's kinda how I think of things when putting on makeup.  Foundation is always the first step I take, the base of for the rest of my makeup.

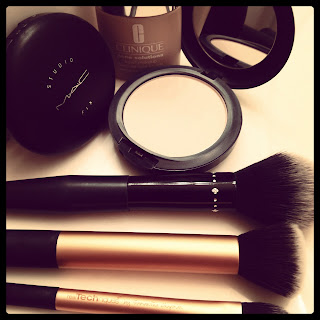
I'm going to jump right into the point of this blog, showing you the easiest way I have found to create a smooth face.  I'll make this short, sweet, and as pain free as possible.  It really is quite simple.  You just need a few things.  Go ahead and grab your liquid foundation, setting powder, a round flat top brush, and a big fluffy brush.


First, put a small amount of liquid foundation on the back of your least dominant hand.  Remember, foundation can appear caked on if too much is used, so start out with only a small amount.  You can always use more if you find that you don't have enough, but removing foundation because you have used too much is a pain!  Grab your flat top foundation brush and gently dab it into the foundation on the back of your hand.
With the foundation you have picked up on your brush, gently dab the brush completely over one section of your face at a time, this is also known as stippling.  This helps to distribute your foundation evenly in a dot-like manner.  Once you have evenly distributed the foundation onto a section of your face, you will need to blend/buff it out to create a smooth finish.  Liquid foundation can sometimes dry quickly, which is why it is important to do one section at a time.  Continue this process on the remaining sections of your face, being careful not to use too much.  It is important to blend out a little bit past your jawline and as close to your hairline as possible to avoid the mask look.
Once you have blended out your liquid foundation smoothly, you will then need to grab a setting powder to match and big fluffy brush.  Again, doing one section at a time, apply powder with a fluffy brush in long sweeping motions.  When you are finished with each section use your fluffy brush to blend it all together.  Using a powder after you have applied liquid helps to keep the liquid in the same spot you put it.  It does this by absorbing oil that is naturally produced by your skin, oil that can cause makeup to slide around on your face.

And that my friends, is all there is to it!  Sounds easy right?  Well, it is!  Allow yourself some time to master the art of foundation.  Practice makes perfect!  It may not look perfect the first few times you try it, but stick with it.  There are many techniques and many tools that can be used when applying foundation, this is just the easiest way I have found to do it.

Thursday, August 30, 2012

Jewelry Candles


As I awoke this morning, I found myself doing something I don't normally do first thing.  I'm a habitual waker-upper, yes that's what I'm calling it, and outside of my routine of coffee-bathroom-couch, I began lighting candles.  I can't say that I was fully aware of what I was doing at the time considering I had only been awake for maybe a total of two minutes.  However, as I have moved on to the third part of my morning routine, sitting on the couch, I feel a sense of peace as the sweet scent of Fall fills my home.  I'm not really sure when Autumn officially starts, but with the help of a new company out of Louisville, I have been able to get a jump-start into my favorite time of the year!  If you haven't already heard about Jewelry Candles keep reading.  These candles may surprise you, in the best of ways!

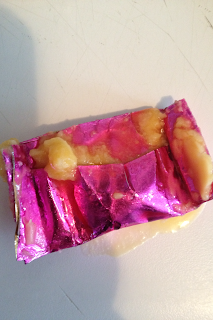
You may be wondering about the name, Jewelry Candles.  What's up with that name?  Well, let me tell you about my favorite part of these candles, which happens to be the first part of the name.  Jewelry!  Each candle comes with a piece of jewelry hidden inside.  It's like Cracker Jacks for grown ups!  Light the candle, and wait for the wax to burn down enough to reveal your prize!  In the melted wax, you will see pink foil, which covers each piece of jewelry.  Inside the pink foil will be a plastic bag which protects the jewelry from being covered in wax. 


 Inside you will find a piece of jewelry ranging anywhere from a ring, earrings, bracelet, etc.  Jewelry Candles claims on their website that the jewelry inside can be worth anywhere from $10-$7500!  That got me excited!  I personally bought two of these candles, both of which had rings inside.
 The first ring surprised me a little.  Upon examination, I found the numbers and letters 18KTGE inside.  I knew this meant something, but I wasn't sure exactly what the meaning was.  I took this ring to an appraiser, who told me that the inside meant 18 karat gold electroplate.  I was excited at first to hear the word "gold", but the appraiser wasn't finished.  He then continued to tell me that electroplate means that the ring is actually made of another metal, probably bronze, and then covered in a thin layer of gold.  He told me that because the ring wasn't solid gold, it wasn't worth much at all.  However, I was still impressed by the ring I had just pulled out of a candle earlier in the morning.  This gave me hope for future pieces of jewelry.  I had proof that not all pieces of jewelry were just costume!


The second ring was a piece of costume jewelry, probably worth about $10.  It was a beautiful silver colored butterfly surrounded by clear stones.  The body of the butterfly was a very pretty purple stone.  I actually liked this ring more than the one that had potential of being worth some money.  It is such a pretty ring that could be worn with almost anything!


Aside from the jewelry surprise in each candle, I really want to tell you about the candles themselves.  Each candle is 21ounces of highly scented soy wax.  I love that these are soy candles!  Soy versus paraffin wax wins every time in my book!  Soy is a naturally derived wax which burns clean and longer than paraffin, which is petroleum based.  Have you ever noticed a puff of black coming from your candles?  If you have, then you are probably burning a paraffin candle.  Paraffin candles are mixed with many different chemicals to create the smell they emit.  Soy candles are made from natural ingredients which burn clean, no black soot, so you don't have to worry what kind of chemicals are being put into your air.  Their soy wax is 100% natural and non-toxic.  Soy candles last a really long time too!  I have been burning mine for about a week now and still have a little over half of the candle left!  Not only do they last, but the scent stays just as strong as the first time I lit my candles!
 I have ordered candles online from different companies in the past that were delivered to my home, some of which arrived in broken glass containers.  This was my main concern when ordering my candles.  When my package arrived I cautiously opened the box, hoping that my candles had arrived in perfect condition.  Upon opening the box, I was immediately surprised, and also impressed, by how my candles had been packaged for shipping.  This was truly the best packaging job I have seen so far for such a delicate item.  Both candles were completely protected with a durable bubble wrap, enough to limit movement of the glass in the box.  Not a single scratch or crack in the glass!  Oh, did I mention that I received my candles in just 2 days?!?  I am definitely happy with the how and when my candles arrived!
I was somewhat skeptical of these candles before buying them.  I thought to myself, "This sounds too good to be true!"  I had many doubts including the quality of the candles themselves and also the jewelry inside.  After trying them for myself, those doubts are long gone!  I know now that these are great products as a whole!  I love the scent that fills my home as I burn these candles, and the jewelry is just as beautiful as I had hoped for!  After a week with my Jewelry Candles I have found myself neglecting all of my other candles.  My Jewelry Candles are the only ones that I want to burn now!

Saturday, August 18, 2012

The Basics


A Clean Canvas


Before you can even begin to think about applying makeup of any kind, you must remember to start with a clean, moisturized face.  If your skin is oily, your makeup will only appear shiny and slide all over the place!  If your skin is dry, your makeup will settle into dry areas and appear patchy and flaky.   I myself have combination/acne prone skin. I have been testing several products for my skin type over the past year, from high end to drugstore products, and have found myself madly in love with the Clean & Clear Advantage line for acne prone skin.  I use both a gel cleanser, which you can see on the left, and an exfoliating cream, which you can see on the right.  I have also been through several moisturizers as well, some of which I liked.  But none compared to the St. Ives Timeless Skin Collagen Elastin Facial Moisturizer.  It's light weight and full of moisture!  I haven't had a patch of dry skin in months now!  Find a face wash that is compatible with your skin type and be sure to wash, pat face dry with a clean towel, and apply moisturizer onto your entire face and neck.  Allow your skin to absorb the moisturizer (this usually takes about 5 minutes), and then you are ready to apply your makeup.